How To Live Stream A USB Webcam On a Raspberry PI 2
The EEVblog Lab had a HD Dropcam so that people could watch what was happening live in the lab. It worked well enough, but then Dropcam changed their terms and conditions and wanted to merge with Nest (who bought them). This was bothering Dave so the search for an alternative began.
Surprising, there are very few options on the market that:
a) Allow low frame rates in order to reduce upload bandwidth (The lab ISP has a monthly bandwidth cap)
b) Are low enough power and work completely autonomously
c) Don’t cost an arm and a leg
d) Provide the ability to embed the stream into a public website so people could watch without having to go another site.
We had spare Logitech webcams (UVC ones should work fine, H264) which were that would provide good image performance, so it was simply a matter of finding a hardware and software solution to match. A Logitech C905 was used in the final solution even though we had better C920’s, they will be saved for use as the live show cameras.
We have several Raspberry Pi 2 sitting around and their power usage won’t substantially increase the power bill, so it seemed natural to use one of them.
A CDN(Content Delivery Network) would allow bandwidth usage to be constant and predictable, allowing us to ensure we stay under the monthly bandwidth cap. They take one stream from the client and then provide the bandwidth and the means to serve as many people who want to view it. Youtube, Ustream, Vimeo et.al are all examples of CDN’s. A million people can watch the live stream at once and the bandwidth used from the lab is that of only one stream.
To create an economic live streaming device we require power efficiency, low frame rate and high resolution. While there are options out there such as Dropcam we wanted towards something that wasn’t controlled by an organisation with constantly updating terms. After trying out FFMPEG, OBS, and avconv (pretty much FFMPEG) I found the simplest option was to use AVCONV as it didn’t require me to compile the entire thing.
The following will provide the fundamental steps required to setup live streaming via RTMP to a service such as Twitch, ConnectCast, YouTube etc…
There are a few things you’ll need to setup the Raspberry Pi 2:
- Raspberry Pi 2
- Micro SD Card, at least 8Gb
- Keyboard
- HDMI Cable and Monitor
- Internet Connection via RJ45 Connector
- MicroSD Reader / Writer
- A UVC USB Webcam (we used a Logitech C905)
The first thing to do is get some prerequisite software installed on your PC you’ll need the following:
- SD Formatter
https://www.sdcard.org/downloads/formatter_4/
- Download the NOOBS Image, the Lite Image is fine
http://www.raspberrypi.org/downloads/
- Putty, for SSH
Once the above steps are complete:
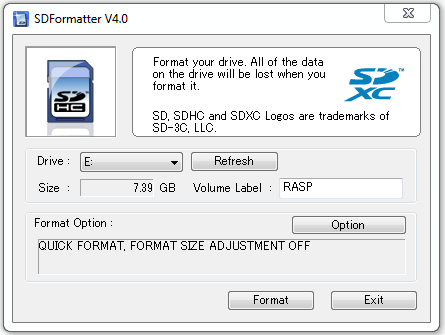
- Insert the SD Cart into its reader, then open the SDFormatter software:

- Ensure that the correct drive is selected then click format.
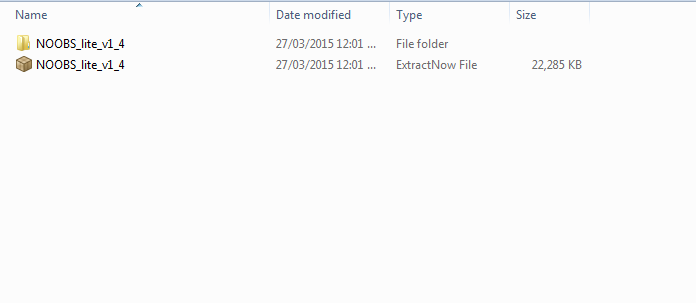
- Extract the Noobs Lite archive downloaded earlier to its own folder:

- Open the folder that the archive was extracted into you should see the following files:

- Copy the contents of the above folder into the newly formatted SD card.
- Safely Eject the SD Card once the files are copied.
- Insert the SD card into the Raspberry PI 2.
- Raspberry Pi 2 has a keyboard, monitor and internet connection then plug in its power.
- The following screen should appear, the top item is what we are going to install, and it’s likely you won’t see all of the options below, this isn’t a problem as long as you see Raspbian.

- Select Raspbian from the list enter, then press (i) to begin the install.
- At this time it’s a good idea to get a coffee because this is the most boring section of the install, it’ll take about half an hour.

…WAITING
…STILL WAITING
…FOREVER WAITING.
…30 minutes later still waiting… - After the installation it’s time for some configuration. In this screen we will enable SSH, and disable GUI if it’s enabled, there is no need for a graphical interface for this project.


- Press the right arrow once in the main menu and select finish, press enter and reboot.
- The system will now boot to terminal, login with the user name pi, password raspberry (you should change this after completing tutorial)
- Type the following commands, you don’t have to do this all as root but it means less typing:
sudo -i
apt-get update
apt-get upgrade
apt-get install -f - Installing AVConv is relatively simple:
apt-get install libav-tools
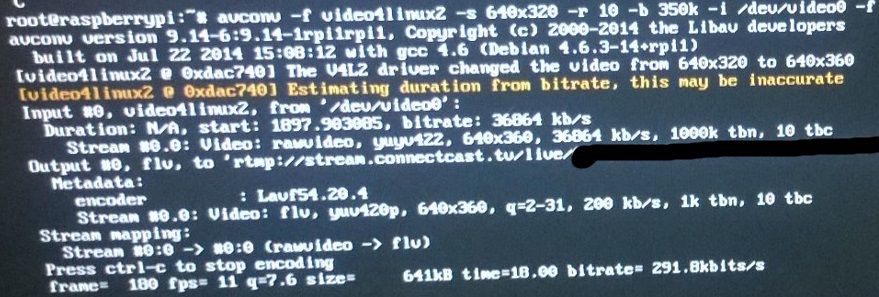
- Time for some testing, I’ve used connectcast and ustream but you can as easily use twitch or any other rtmp service:
Avconv -f video4linux2 –s 640×360 r 10 –b 350k -i /dev/video0 –f flv rtmp://stream.connectcast.tv/live/streamkey
Or for ustream
Avconv -f video4linux2 –s 640×360 r 10 –b 350k -i /dev/video0 –f flv rtmp://x.xxxxxxxx.fme.ustream.tv/ustreamVideo/xxxxxxxx/streamkey
The URL for your streaming service can usually be found on the streaming services website and it is important to keep these secret.
- If the stream starts you’re going well, otherwise be sure that the steam key is correct and the other parameters are in the same order as above.

- Press CTRL+C to stop the stream.


SSH Setup
- Type the following to get the local IP address of the Raspberry PI:
ifconfig
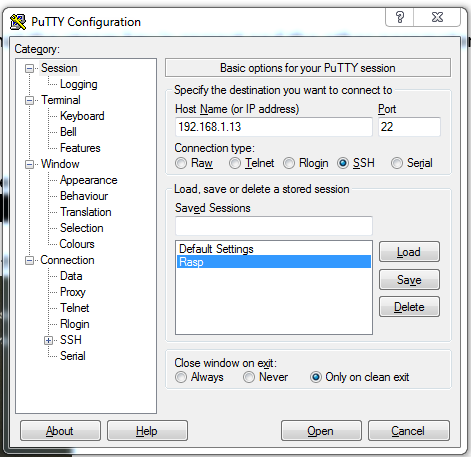
- On the second line of the resulting text note the address after “inetaddr:” mine is 192.168.1.13:

- Open Putty and copy the IP address from before into the host name section:

- Click Open
- Login with the same username and password as before, you will have to accept a public key thing before you do this.
- SSH Setup then become root.
sudo -i
Setup the Boot Script
- Enter the init.d directory, you can copy these commands from this page into putty with right click:
cd /etc/init.d/
- Create a file in this directory by typing the following command:
sudo nano STREAM.sh
- Copy the following into the file, make sure you insert your stream key, the comments must not be left out, debian requires them:
For connectcast:### BEGIN INIT INFO
#Provides:Stream startup
#Should-Start:console-screen debus network-manager
#Required-Start:$all
#Required-Stop:$remote_fs
#Default-Start:2 3 4 5
#Default-Stop: 0 1 6
#Short-Description: Starts avconv and the webcam live stream
### END INIT INFO
set -e
case “$1″ in
start)
RESOLUTION=”hd720″
BITRATE=”200k”
FPS=”2″ #fps
STREAM_KEY=”STREAMKEY”
SERVER_URL=”rtmp://stream.connectcast.tv/live/”
echo “Starting avconv stream”
echo $RESOLUTION ” ” $FPS ” ” $BITRATE ” ” $SERVER_URL ” ” $STREAM_KEY
sudo avconv -f video4linux2 -s “$RESOLUTION” -r “$FPS” -b $BITRATE -i /dev/video0 -f flv $SERVER_URL$STREAM_KEY
;;
stop)
echo “STOPPING STERAM”
skill $PROGRAMNAME
exit 1
;;
esac
exit 0Or for USTREAM:
### BEGIN INIT INFO
#Provides:Stream startup
#Should-Start:console-screen debus network-manager
#Required-Start:$all
#Required-Stop:$remote_fs
#Default-Start:2 3 4 5
#Default-Stop: 0 1 6
#Short-Description: Starts avconv and the webcam live stream
### END INIT INFO
set -e
case “$1″ in
start)
RESOLUTION=”hd720″
BITRATE=”200k”
FPS=”2″ #fps
STREAM_KEY=”STREAMKEY”
SERVER_URL=”rtmp://x.xxxxxxxx.fme.ustream.tv/ustreamVideo/xxxxxxxx/”
echo “Starting avconv stream”
echo $RESOLUTION ” ” $FPS ” ” $BITRATE ” ” $SERVER_URL ” ” $STREAM_KEY
sudo avconv -f video4linux2 -s “$RESOLUTION” -r “$FPS” -b $BITRATE -i /dev/video0 -f flv $SERVER_URL$STREAM_KEY
;;
stop)
echo “STOPPING STERAM”
skill $PROGRAMNAME
exit 1
;;
esac
exit 0 - Make the script executable with the following commands:
chmod 755 /etc/init.d/STREAM.sh
chown root:root /etc/init.d/STREAM.sh - Register it to be run at start-up:
update-rc.d STREAM.sh defaults
- Reboot and your device should start on boot!
reboot
Related Readings
Popular Circuit Diagrams
Special Sale
Model
Price
